Do you want to get to know your Blood Pressure?
BlutDruckE
How do I get BlutDruckE and what requirements have to be fullfilled?
You can download the App in Apple's App store For installation you need an iPhone with iOS 11.1 or newer version. After installation the Ap is ready for use and for getting you data.
Will my data transfered to an external location?
Your data is your property and I respect this 100%. At no time there is a communication with any kind of server. Your data is saved only on your device. If you do an export of your data from the App you decide wehere you put it.
Does this App do a meassurement of the blood pressure?
No, this is not possible. The iPhone has no capability to meassure the blood pressure build in. You must use an extra blood pressure meassurement device and transfer the data.
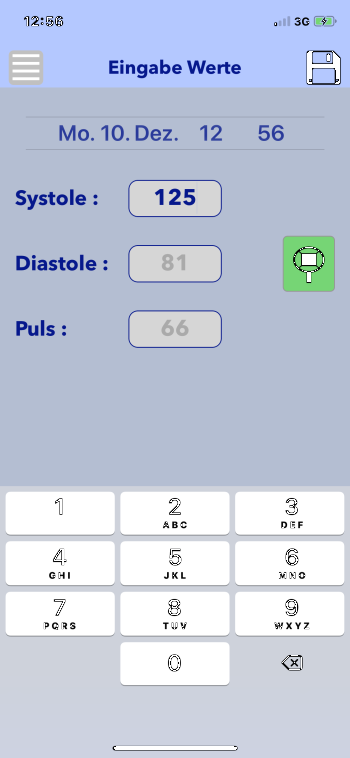
This is the area where you put in the data for Systole, Diastole, Pulse and Date, Time. You do that by using the iPhone keyboard or with speech input. After touching the Save button your values will be saved in the internal database.

Picture 1
Picture 2
Picture 3
Picture 4
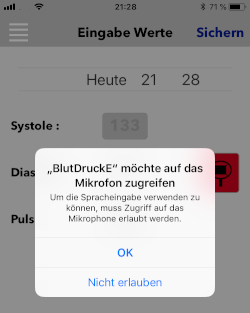
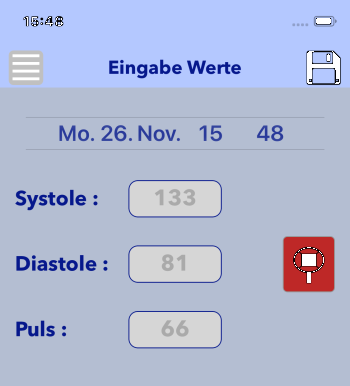
After touchin the menu Input values ( Picture 1 ) you will see the view for input of the data. With a touch in the intended field, the keyboard wil be shown and you can input your number. ( Picture 2 ). Get into the next field by touching it and key in your number there. The date and time is a wheel and by turning this wheel you select your needed value ( Picture 2 ). Do you want to input your data with speech input you must first touch the green microphone ( Picture 2 ). Doing this the first time you will be asked for a release to use the microphone. Please confirm the popup window with OK ( Picture 3 ). If you don't do this you can't put in data with speech input. After giving permission for speech input the microphone icon becomes red and you can start speaking the numbers ( Picture 4 ). Please speak the three numbers for systole, diastole and puls. Between the numbers please say "komma". When done with speech input, please touch the red microphone. This triggers the input of the numbers in the fields and the microphone is becomming green again.
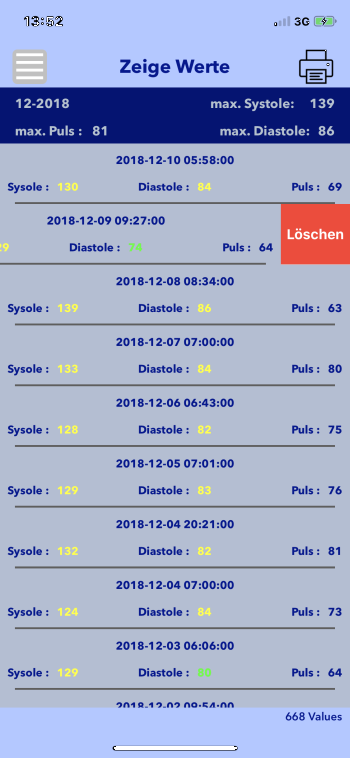
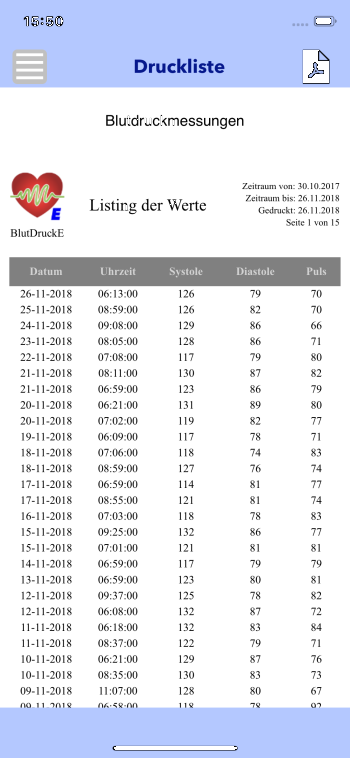
With this menu point you can llist all data. With this list view you will see also the max. values for the month. WIth this list view you can also chjange and delete data.

Picture 1

Picture 2
Picture 3
Picture 4
Picture 5
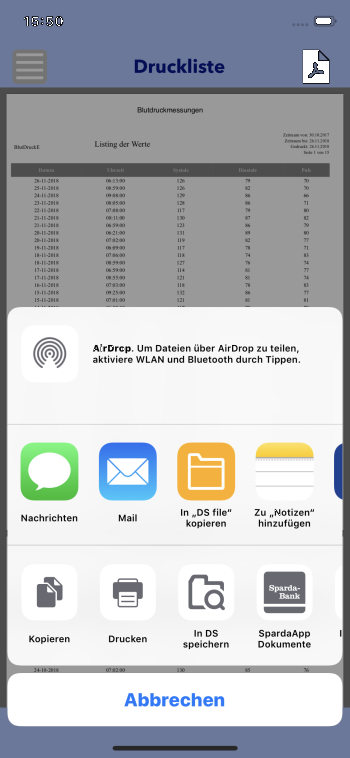
With a touch to the menu point Show values ( Picture 1 ). The view with the llisting of the data will be presented. By scrolling you can browse all data. In doing so the monthly max. values will be shown ( Picture 2 ). The values are shown in the colors green, yellow and red according to the standad. With a touch to the list element the view to change values will be shown. (see Changing values). With a swipe to the left you trigger the known dialog for deleting a record for the iPhone wil be shown ( Picture 3 ) and with the requested confirmation the record will be deleted. With the icon for printing you can print a list of all the values ( Picture 4 ) or saved as a PDF file ( Picture 5 ).
Changing the input data starts with the list view. With a touch to the list element the view to change values will be called and you can change your values.
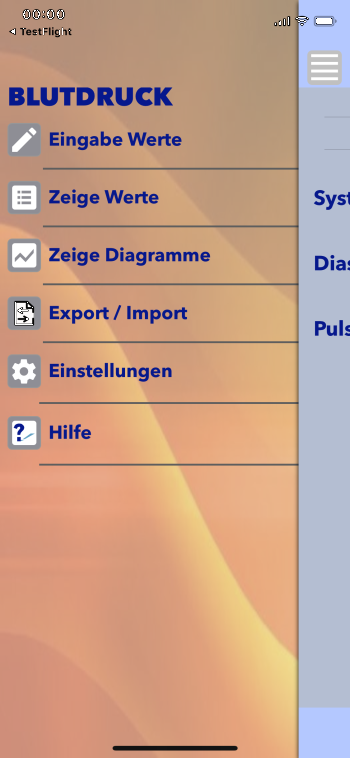
Bild 1
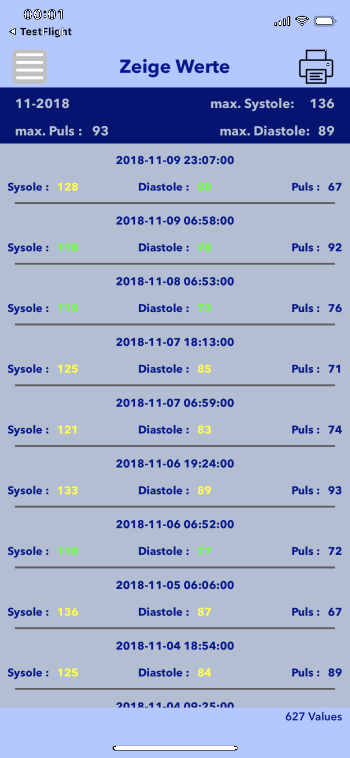
Bild 2
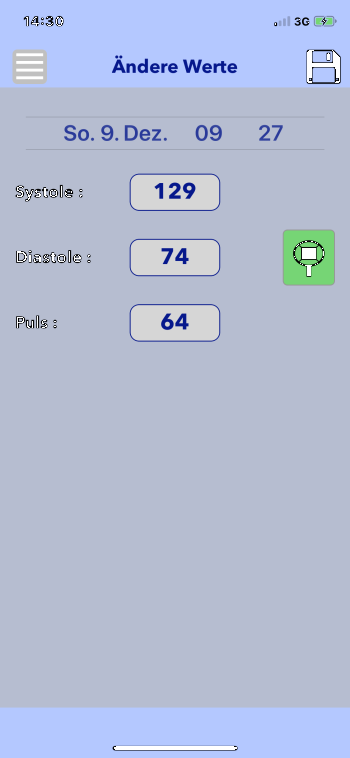
Bild 3
With a touch to the menu point Show values ( Picture 1 ) you change to the list view. Here you scroll to the record you would like to change and touch to the line ( Picture 2 ). Now the edit dialog appears ( Picture 3 ) and by editing and saving the values with the save button you can change the record. With touching the textfield you chang change the value. It is also possible to change the values by speech input (see editing the values).
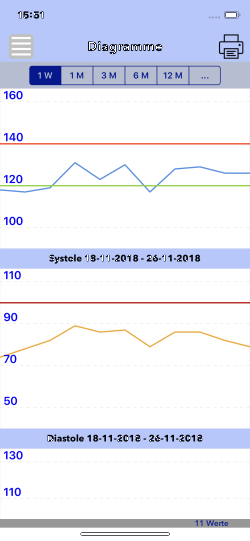
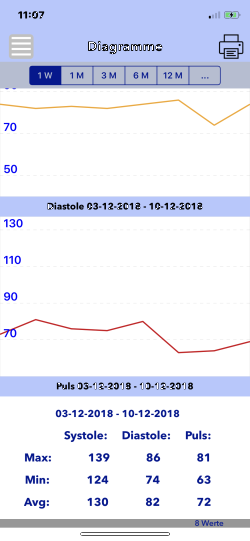
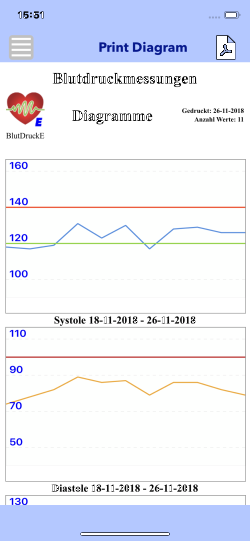
With this menu selection you see the inputted data as a diagram. Systole, Diastole and Puls in its own diagram. By scrolling down the view you will find a summary and average values. The diagrams can be printed or saved as a PDF file.

Picture 1
Picture 2
Picture 3
Picture 4
Picture 5
Picture 6
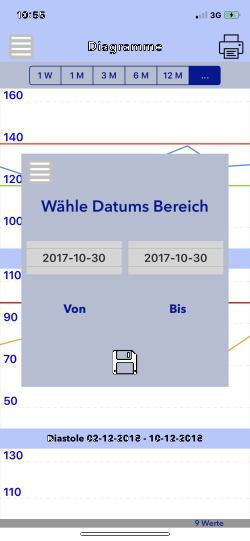
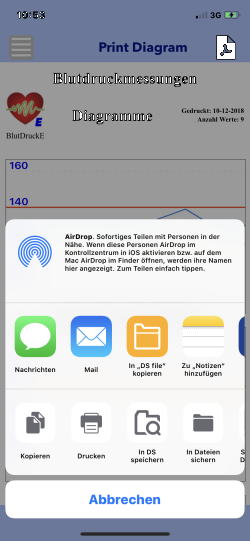
First you select with a touch to the menu Show diagram ( Picture 1 ) the view to show the diagram of the data. By scrolling the view you see the different diagrams and the summary at the end. ( Picture 2, Picture 3 ). The blue menu bar at the top of the view is selecting the date range shown in the diagrams. The range can be 1 week, 1 month, 3 month, 6 month 1 year and a self defined time frame. By selecting the self defined time frame a windows pops up to select the time frame ( Picture 4). With the save icon the data range is shown in the diagrams. With the print icon all diagrams are printed or saved as a PDF file. ( Picture 5 and 6).
Mit diesem Menüpunkt können Sie Daten die Sie eingegeben haben, als JSON Datei exportieren. Dazu werden Sie über einen Dialog aufgefordert den Ort und gegebenenfalls eine Mailadresse anzugeben. Je nachdem welche Möglichkeiten auf Ihrem Gerät vorhanden sind, kann die JSON Datei auch auf einem externen Server gespeichert werden. Die gespeicherte oder per Mail verschickte JSON Datei kann später über die Import Funktion auch wieder eingelesen werden.
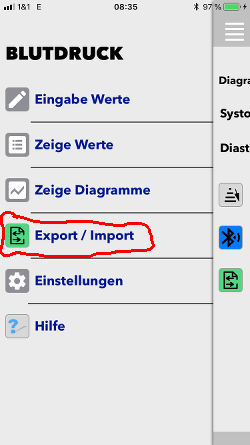
Bild 1
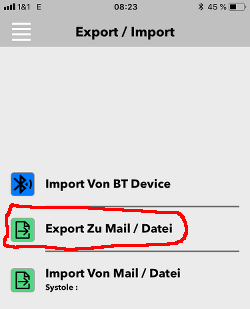
Bild 2

Bild 3
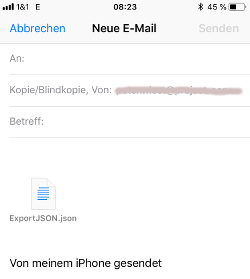
Bild 4
Mit einem touch auf den entsprechenden Menüpunkt (Bild 1) wird zur nächsten Auswahl verzweigt. Dort dann z.B. Export auswählen (Bild 2) und es kommt dann zur Auswahlmöglichkeit wohin die Daten exportiert werden sollen. Im nächsten Fenster z.B. Mail auswählen, um die Daten per Mail zu versenden (Bild 3). Jetzt den Mailempfänger angeben, einen Betreff und eventuell einen Text zur Beschreibung eingeben. Dann die Mail wie gewohnt mit dem Versenden Button versenden (Bild 4).
Mit dem Menüpunkt Import von Mail / Datei können Sie Daten die Sie zuvor per Export entweder als Datei gespeichert, oder per Mail versendet haben, wieder importieren. Nach dem Import Vorgang wird die Anzahl der importierten Datensätze angezeigt (Bild 6).
Bild 1
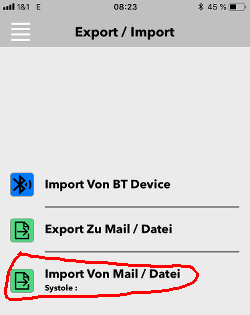
Bild 2
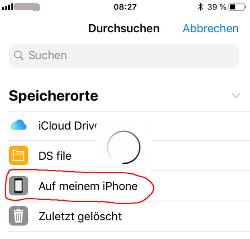
Bild 3
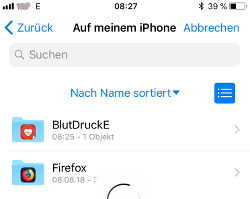
Bild 4
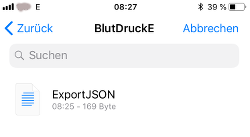
Bild 5
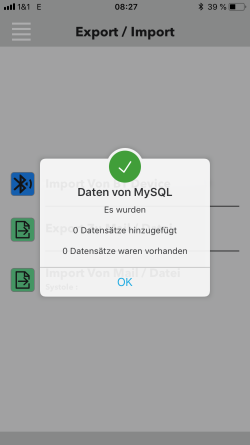
Bild 6
Mit einem touch auf den entsprechenden Menüpunkt im Hauptmenü (Bild 1) wird zur nächsten Auswahl verzweigt. Dort dann Imoprt auswählen (Bild 2) und es kommt dann zur Auswahlmöglichkeit aus welcher Datei die Daten importiert werden sollen. Nun so lange die entsprechenden Ordner selektieren (Bild 3 - Bild 5), bis die Datei ExportJSON ausgewählt werden kann. Jetzt diese Datei selektiren und der Import Vorgang startet automatisch. Es wird ein Popup Fenster angezeigt, in dem dann die Anzahl der importierten Datensätze angezeigt wird (Bild 6). Mit OK bestätigen und jetzt sind alle Daten im Programm gespeichert.
Mit dem Menüpunkt Einstellungen werden Vorgaben für bestimmte Bereiche eingestellt.
Bild 1
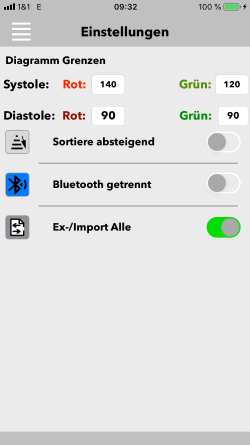
Bild 1
Mit einem touch auf den Menüpunkt Einstellungen im Hauptmenü (Bild 1) wird zu den Einstellungen verzweigt. Nun so lange die entsprechenden Ordner selektieren (Bild 3 - Bild 5), bis die Datei ExportJSON ausgewählt werden kann. Jetzt diese Datei selektiren und der Import Vorgang startet automatisch. Es wird ein Popup Fenster angezeigt, in dem dann die Anzahl der importierten Datensätze angezeigt wird (Bild 6). Mit OK bestätigen und jetzt sind alle Daten im Programm gespeichert.